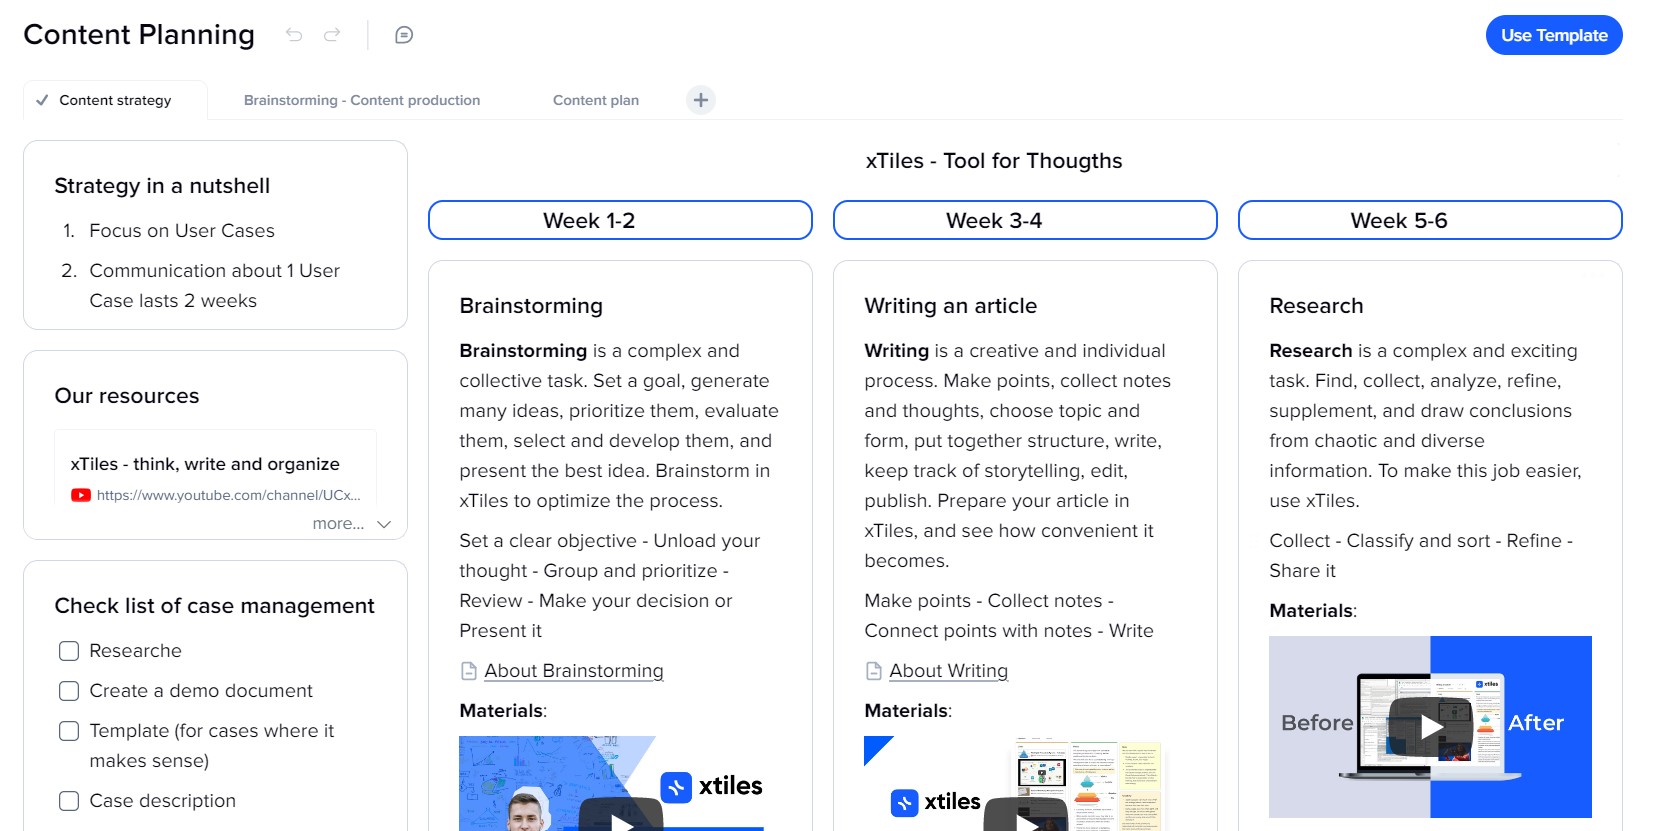
Consulting Project
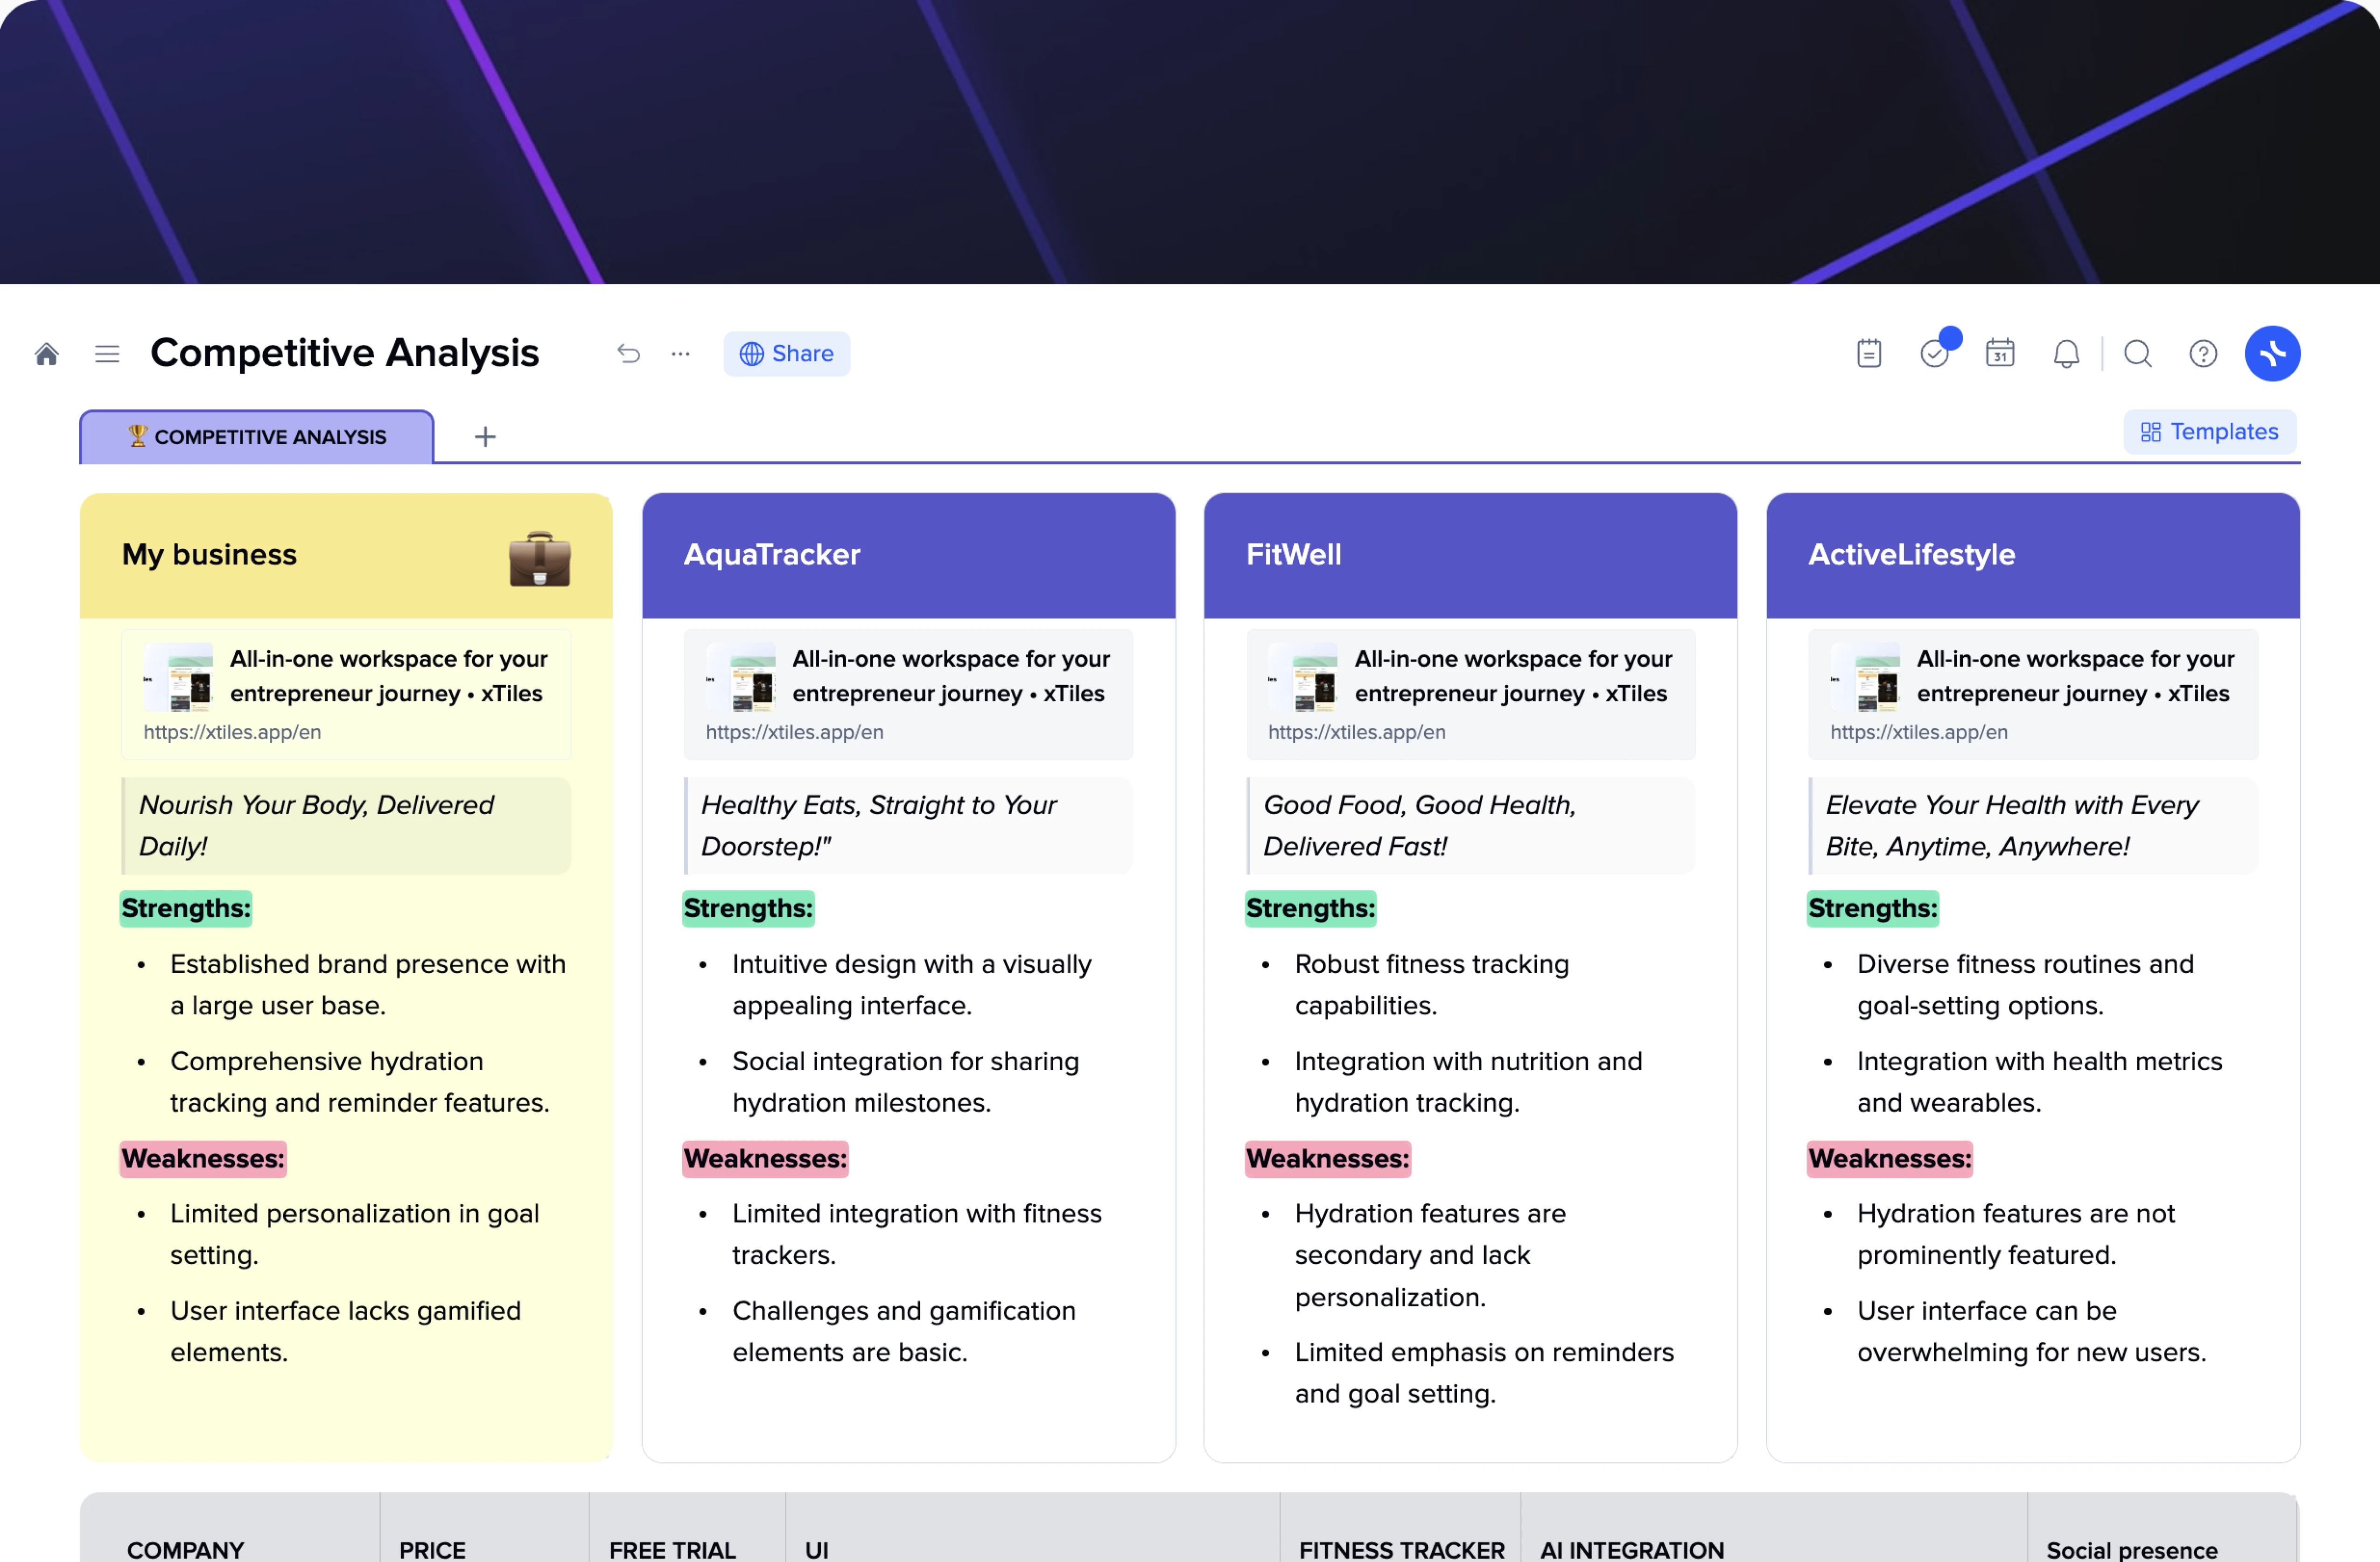
Competitive Analysis
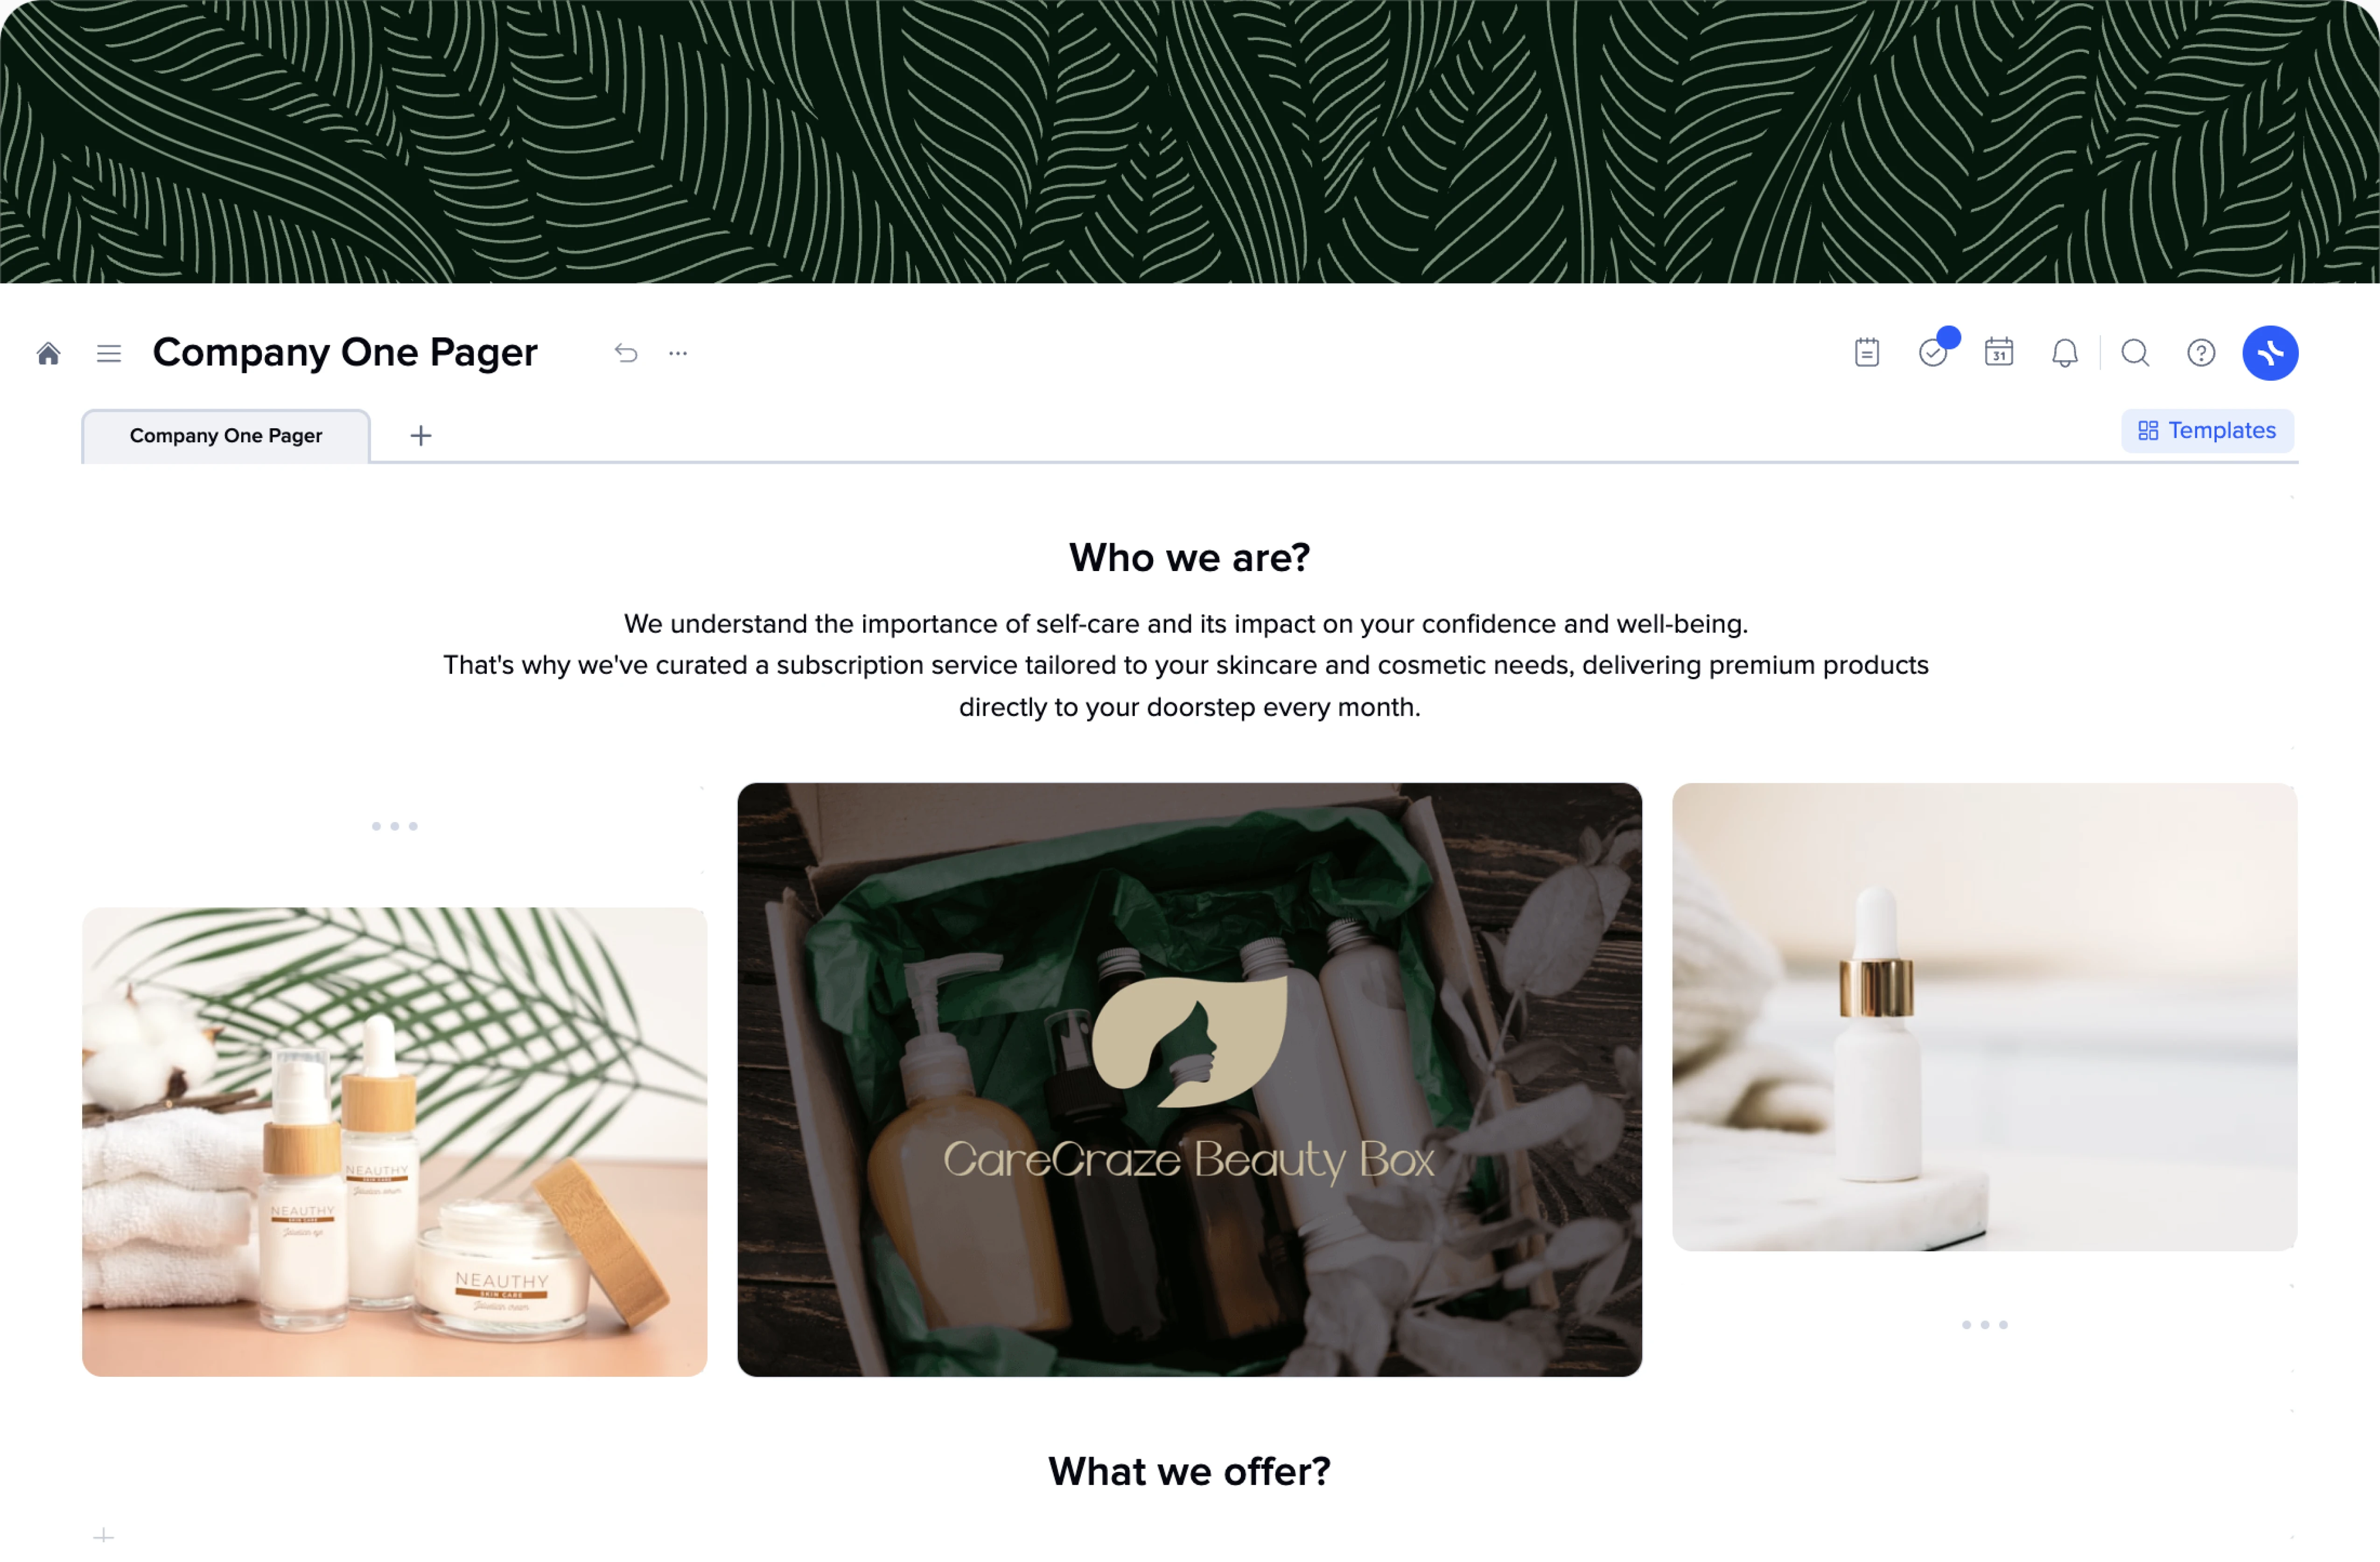
Company One Pager
One Pager Template
There’s a fine line between inspiring people to learn more about what you can offer and discouraging them. How can you put in a couple of sentences everything worthy about your business? Yes, it’s a challenge, but we’re here to help you complete it successfully. Certain rules and principles help to grab people’s attention, so they present us with the most valuable asset they have – time. Then, using the polished structure and refined content to tell them the most important things about ourselves, we can engage our potential audience.
Companies are constantly trying to come up with new methods to be ahead of their competitors and win the fight for people’s attention. However, among all the latest marketing tricks and approaches, few maintain their status quo. These tools have already proved their effectiveness over the last few years, and the latest research shows that it won’t change much over the next few years.
One of them is a one-pager – a document that presents your business in the most concise yet compelling way. Some may think that one page is not enough to tell everything important. However, once you have a clear structure and know what exactly to put into your company’s one-pager, you will see that that’s the perfect size to introduce your business to everyone who may be interested. The modern world is constantly changing, never stopping for too long on something. That’s why one page is the perfect amount of space to contribute everything you find worthy of sharing.
Before we start working on your one-pager using xTiles template, let’s go over what exactly a one-pager is and why neglecting its creation may be a bad decision.
What is a One Pager?
So, what is a one-pager? It’s your company overview, the essence of your company history, goals, beliefs, values, plans, etc. This document’s name speaks for itself. Telling the world about your company, you will be limited to one page. Is it enough? More than you would think. You have enough space to explain why you’re the one, and the potential customer won’t sacrifice too much time learning it. It’s a win-win situation.
Many business owners would like to talk about their companies for hours which is completely understandable. However, that’s not an option when you try to attract someone’s attention. Maybe later, you could go back and forth, but the beginning should be intriguing, amusing, and arousing interest in your company. Then, you will have a chance to go further and present your customer with every detail.
One-pagers rules no one speaks about
There are certain rules regarding how a one-pager should look and what it should contain. And naturally, when creating one, you will find that there are pitfalls we would like to mention too.
- The first rule of a successful one-pager is to make it look easy but give the feeling of how much you have put into it. A well-done job, in this case, a great one-pager, stands out for any company better than anything else. If you can work so devotedly on your one-pager, then you take this approach for everything else.
- One-pagers are the best option to tell the most important things about your company in a visually appealing way. Why is the visual part so important? Because it’s what people estimate in the first place. Although we know that there can’t be a lot of text in one-pager, there still is content people need to consume, which takes a couple of minutes. While colors, designs, elements placement, etc., can be checked in a couple of seconds. Visuality is a convincing factor to look further.
- A successful one-pager is humble but confident. There’s no need to brag about your achievements because that would be the last thing that helps to build credibility.
- Your one-pager is about your audience, their needs, and how your company and its features may help. When you start working on it and through the whole process, try to put yourself in potential readers’ shoes. Would you hastily nod to every sentence?
When do you need a One Pager?
An attention-grabbing one-pager will come in handy for different purposes. The main and foremost is to attract attention to your company and what you do. One-pagers help to pitch potential investors or customers. It’s likely to be the first step for long cooperation. However, the scope of the application may be much wider.
- One-pagers are good for advertising your business, providing people with a clear image of your company in the shortest possible time.
- They work as a guarantee of quality, building your company’s reliability. The fact that someone devoted their time to creating a document that saves time and effort to learn something is appealing.
- Your one-pager is not a one-time action. Although any company tries to evolve and develop, it still will be up-to-date for some time. And next time you need to make a new one-pager or renovate the existing one, you will know what exactly should be there.
- A one-pager may also be a great element of onboarding for new employees or all applicants. It’s good to convey your company’s value not only to potential customers or investors but also to those who want to become team members.
One Pager elements
We understand that there is so much of everything you would like to share. One-pager size might be a challenge. What should be there? What is not so important and can be deleted? These are hard questions. That’s why one-pager templates are so helpful and needed. They spare you the torment of choice, offering you a polished formula of what needs to be said.
Sometimes, people start working on a one-pager by looking for other companies’ one-pagers ideas. It may seem that the internet is full of one-pagers examples. The thing is that each company is different and what suits one is likely to be useless for others. However, research and comparison is always an intelligent decision if only you have enough time.
Creating our example of a one-pager, we checked hundreds of them to come up with the perfect structure. Here’s what we’ve learned about a one-pager that captures attention and holds it till the last word.
You can divide a page into three equal zones. Each of them is hugely important and better not be skipped. It may seem that the top of a one-pager is more significant than the bottom, but it’s not quite true. They simply differ because of the information you put there. If the content is distributed properly, each of them would be attractive and interesting to a reader.
What to put at the top of your one pager?
- Obviously, it’s good to start with your company’s logo. Let them know you and let them know what to expect. It sets the tone for further introduction. You also can share your company’s short story. It will break the ice and let them know and understand you better.
- The logo played its role, and now your pain points have to grab their attention and hold it. Find what your audience specifically needs/wants and give them something they can relate to. In this part, trying to win everyone’s hearts might play a bad joke with your expectations from your one-pager. So, be as specific as possible.
- Finally, give the solution, the climax everyone seeks. Tell your audience that the problem described in the pain points is not a problem at all if you’re in this together.
What to put in the middle of your one pager?
Now you can talk about your business and its features a bit more. The middle part of a one-pager is a good place to tell them why your company is special and how it works. It may be a list of benefits (24/7 service, trained employees, guarantees, advanced techniques and approaches, etc.).
If you think such a list will not speak for itself and might not seem very convincing, you can use a “so what?” trick. Question every benefit and answer, prioritizing your audience’s needs. What does it give to you? You provide the audience with additional facts and avoid misunderstandings, explaining what exactly hides behind each feature you offer.
To conclude everything mentioned above, you can share what benefits the audience will get from your specific features.
What to put at the bottom of your one pager?
Now, let’s inspire your audience to take action and get in touch with you. The last part of our one-pager structure is CTA (call to action) and your contact information.
- CTA should be catchy and relatable but try to avoid using cliches or cheezy phrases from your sphere that everyone is already tired of. So, there are only two options – be simple and true or be creative.
Be very careful with jokes and puns, as they might level out everything you’ve reached with all the previous text.
- Add your phone number and email address and everything you can freely include – your social media, especially. Let it be easy to find and learn more about you.
Optionally, and if there’s enough place, you can share your testimonials. They will work as your advertisement too.
Other tips for creating your best one pager
We’re almost finished. You have our one-pager template, and we reviewed the most important parts and elements. Let’s finish with the last tips that will complement the overall picture.
- Since your one-pager is supposed to present your company, it would be good to have the team members involved. Take many visions of your business and summarize them.
- Sometimes, trying to be serious in their one-pagers, people accidentally cross the line and fall into boredom. Besides presenting the right information, you need to do it the right way – making it easy and appealing.
- You might need more than words to deliver your message. Visual content will be a great addition. Videos, images, GIFs, etc., are far easier to remember than text. However, you should be careful in maintaining the balance. We’ve seen many one-pagers examples where rich media are superior to textual elements making it hard to concentrate on the information.
- Make your pitch document fully responsive. Many users prefer to get information using their phones. And if there’s no mobile version of your one-pager and a person needs to zoom and scroll all the way, it might be a powerful factor to stop.
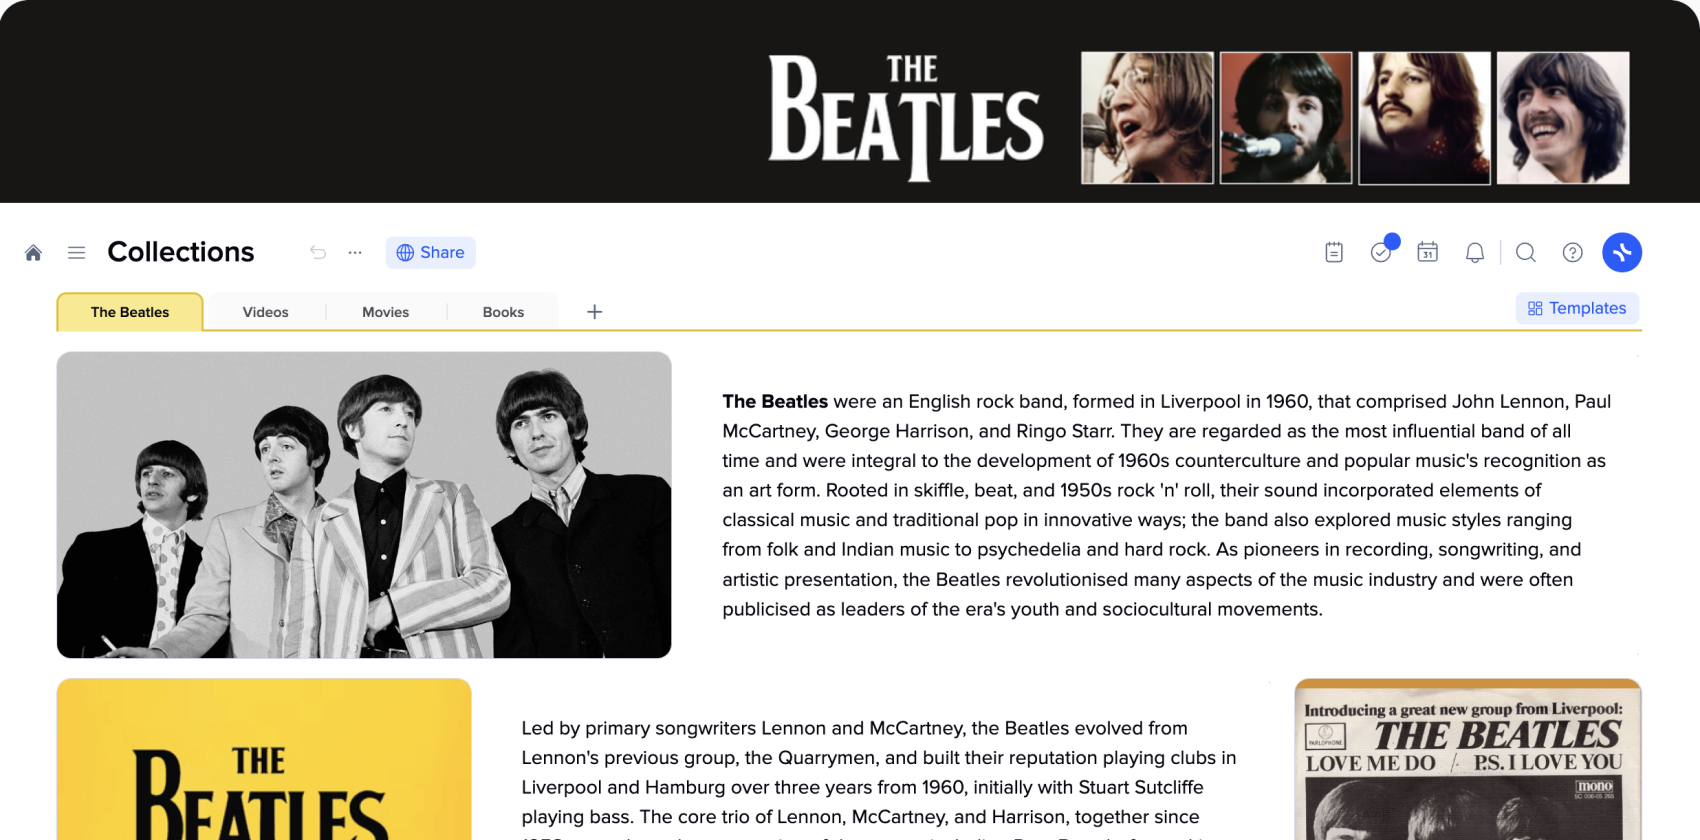
Collections Template
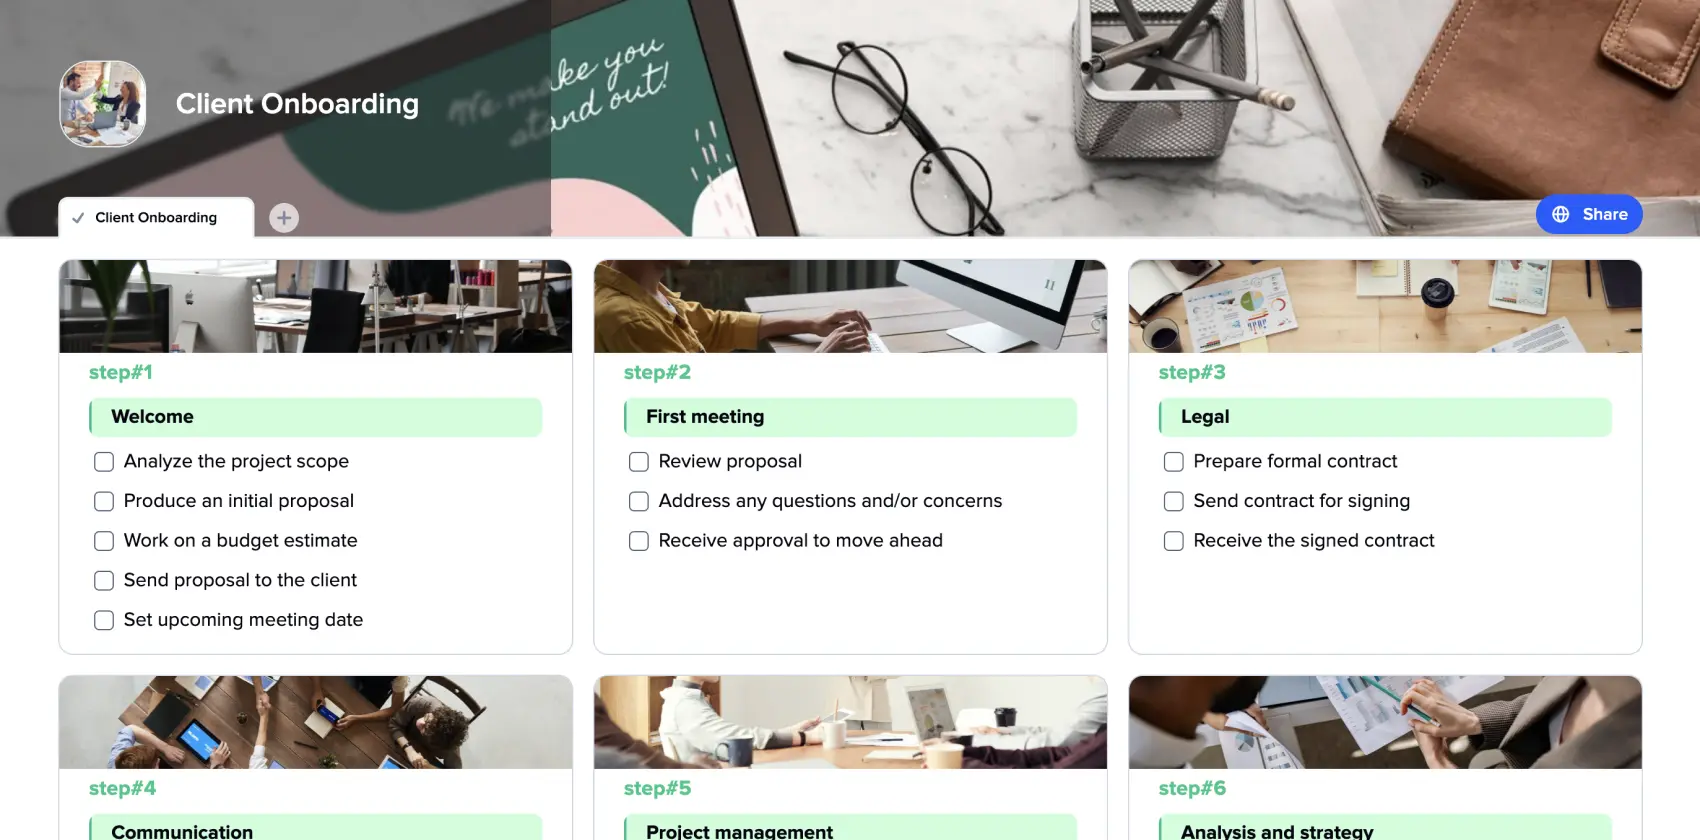
Client Onboarding
Cleaning Log
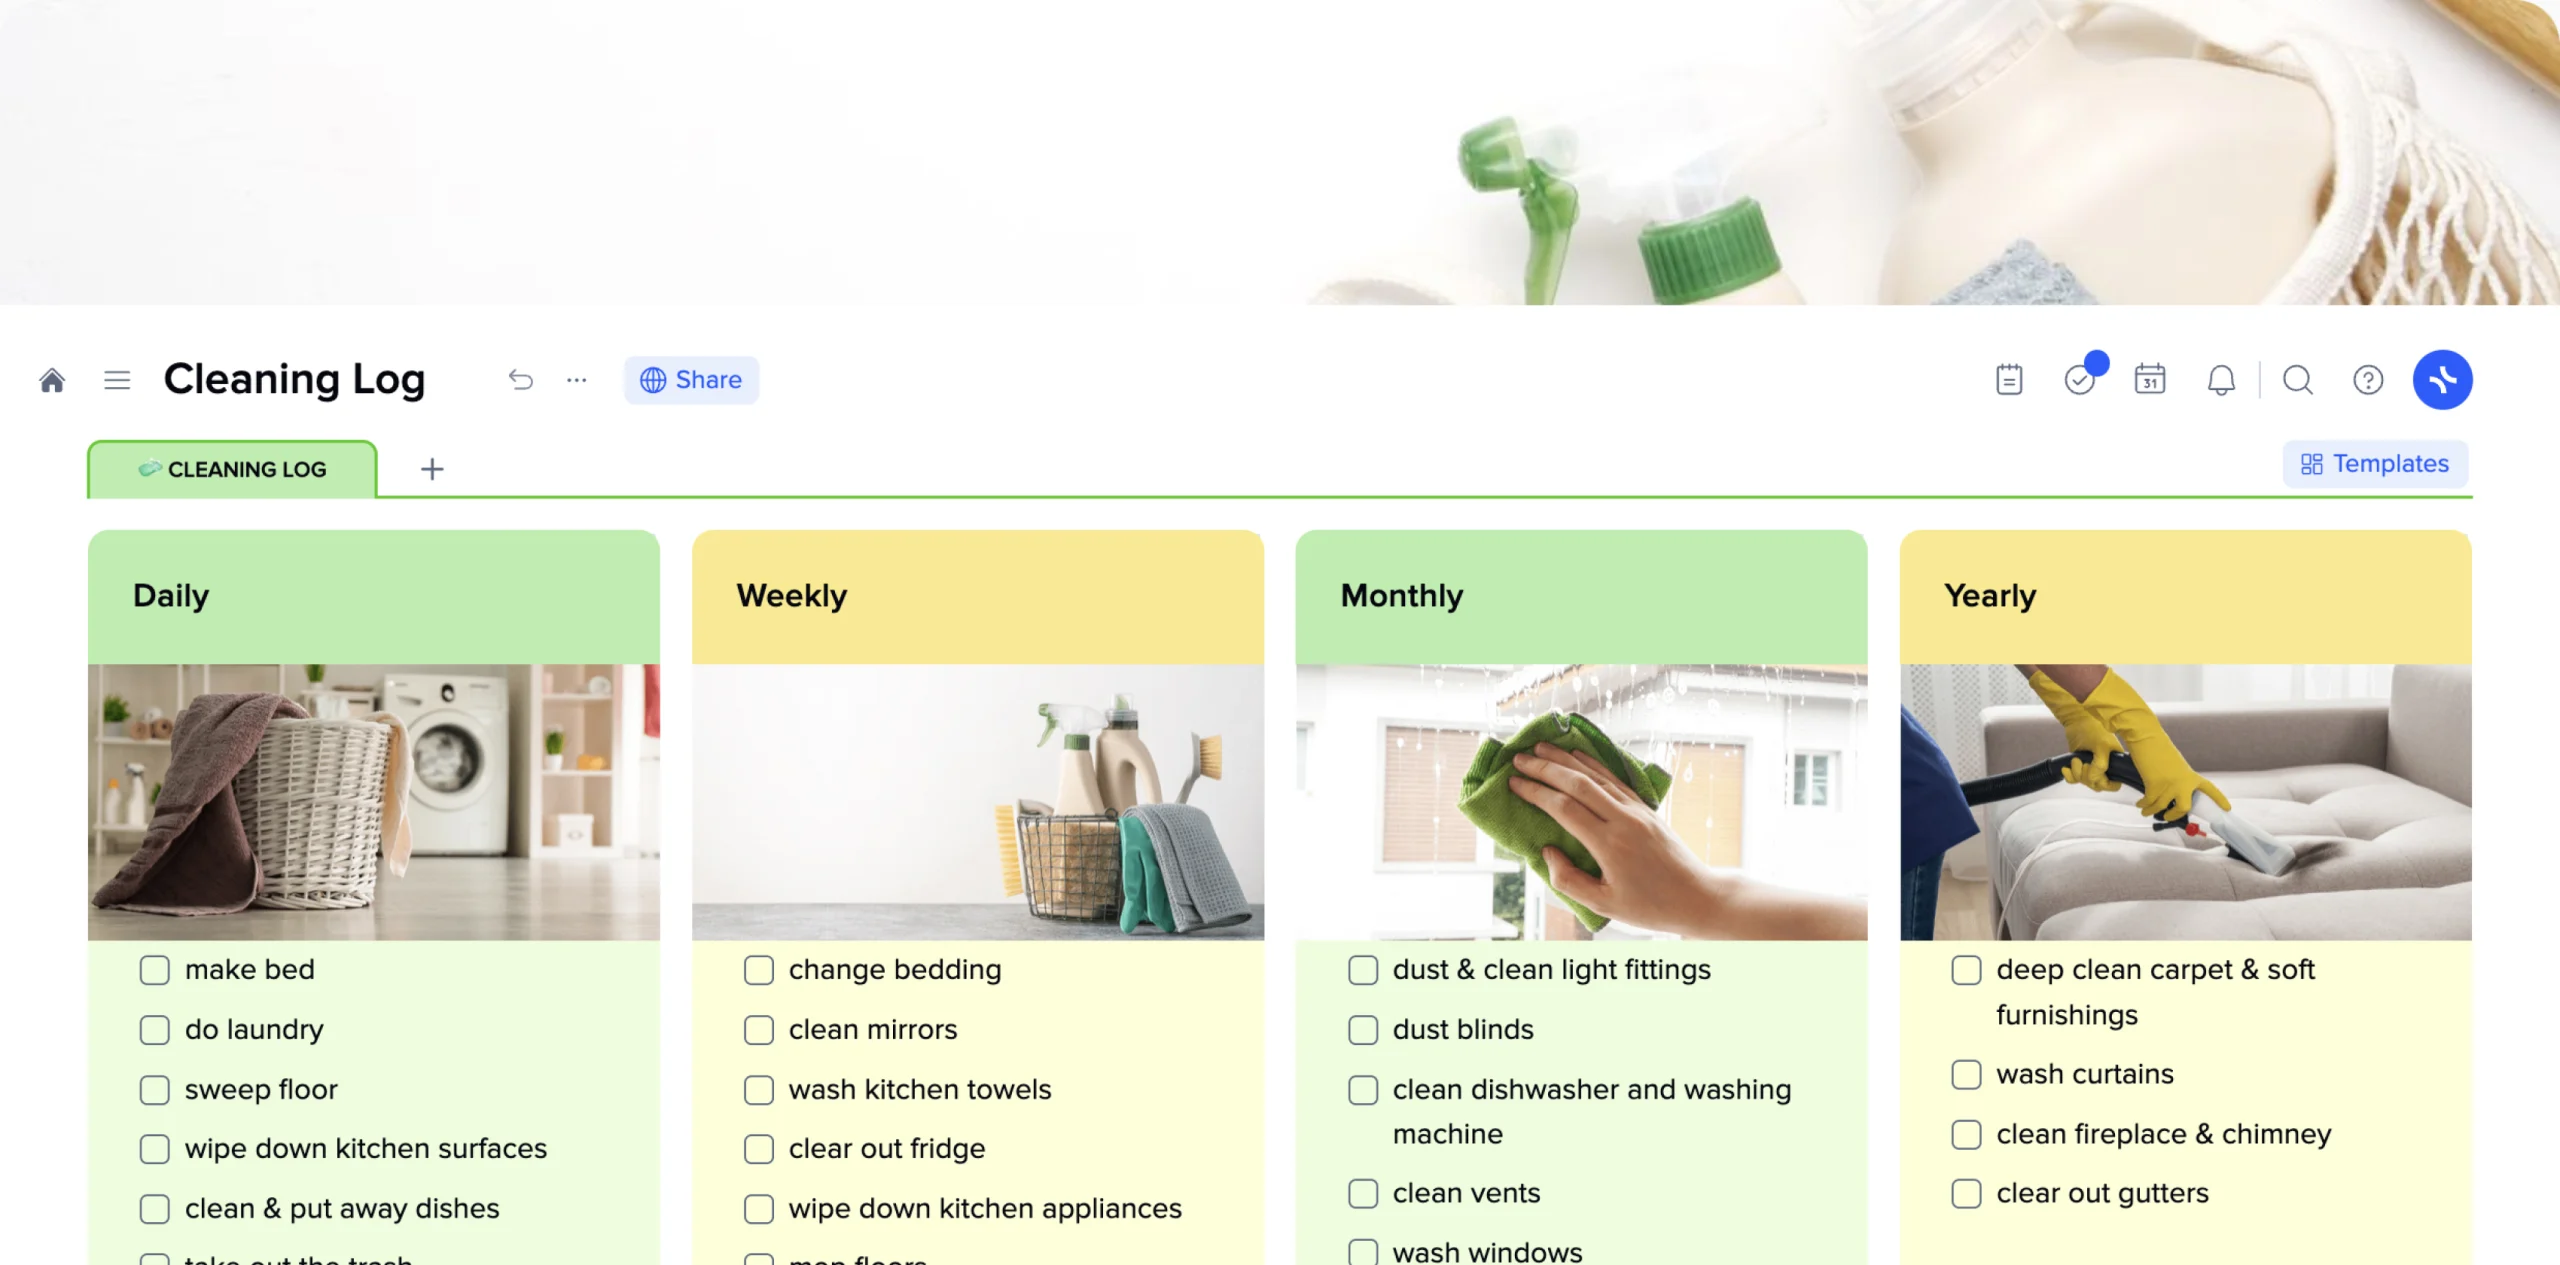
Cleaning log template
Cleaning is rarely a pleasant experience, and it’s often less effective without a clear plan of what and when to clean. Without proper planning, you risk undoing the results of your previous actions, such as dusting after sweeping the floor.
A cleaning log is a tool to track and maintain cleanliness standards. Cleaning logs are crucial for environments where cleanliness is necessary, such as hospitals, restaurants, manufacturing facilities, or laboratories.
However, cleaning logs are handy for housekeeping to organize cleaning effectively and for people who provide cleaning services to establish quality standards and efficient workflow.
A cleaning log template helps to build plans of what and where must be purged quicker and is suitable for specific cleaning purposes. For example, a chimney cleaning log or a fireplace cleaning log is quite popular for helping people manage processes they are rarely involved in.
The xTiles Cleaning Log helps you keep your residence clean and tidy, organizing all the cleaning processes depending on how often they should be repeated. Additionally, we offer you a quick guide on building a cleaning log that will work for years to come so there will be no dust in your house.
What are the advantages of using a cleaning log?
A cleaning log is a helpful tool for maintaining your household effectively with less effort on its cleanliness. Providing you with a plan of what and when you need to clean, such a document saves you a great deal of time in planning each cleaning and maintaining it.
Besides boosting the organization of your clean-up, the log will also help you distribute all the chores evenly throughout the day, week, or month so that they won’t be a burden that steals the whole day from you.
Certain industries or organizations may have specific regulations or standards that require regular cleaning and documentation. The log serves as evidence that cleaning protocols are being followed.
If you’re a part of such an organization, you will be obliged to fill in your cleaning log regularly. However, whether it eases your life as an employee depends on the pre-designed structure of the template the company uses.
Inside a company, the log also serves as a communication tool between different shifts or cleaning staff. It helps convey information about completed tasks, ongoing issues, or special instructions for specific areas or items.
Also, the log will help you identify patterns or trends in cleaning activities, allowing you to build your clean-up strongly according to your household or company needs without wasting time on unnecessary actions.
Finally, when regulatory authorities or auditors visit a facility, they may review the cleaning log to assess cleanliness practices and adherence to regulations or standards.
All of these advantages are deepened and widened by ready-to-use templates that multiply cleaning logs’ time efficiency. They may be in different formats, so you can find the one that works for you. You may create a physical logbook using paper and pen, use spreadsheet software templates like, let’s say, bathroom cleaning log sheet pdf or bathroom cleaning log sheet, or use specialized digital tools for planning like xTiles.
As you can see, the cleaning log is much more than just a list of what you need to tidy up occasionally. That’s why a comprehensive cleaning log template that helps to organize and streamline your usual cleaning is a healthy addition to your routine. In many cases, when chosen wisely and filled in regularly, it helps people who hate cleaning manage all the tasks in a shorter time.
How to make a cleaning log?
Creating a cleaning log involves a few key aspects to consider. First, you can create a cleaning log for specific situations, such as a bathroom cleaning log. Alternatively, you can create one comprehensive cleaning log that covers the entire house in the long run.
The second case is easier to integrate into your usual routine. The first one might require adjustments whenever you want to implement it. However, both of them have the right to exist, and both of them may be highly helpful if crafted according to your needs and capacities.
- Before you start adding points to your list, determine the scope of work that needs to be done. Do you want to clean up the whole house? Do you want to clean only a part of it this time?
- Identify the areas, items, or tasks that need to be documented in the cleaning log depending on how much work there will be.
Now you need to define the categories and columns in your log. The xTiles Cleaning Log Template offers a long-run structure with specific tasks for a day, week, month, and year. Such a structure allows you to keep the scope of work manageable.
If you’re creating a cleaning log from scratch in xTiles because the offered structure doesn’t suit your case, you may decide on other categories or sections you want to include in the cleaning log. For example, common categories for an office or any other large premises are date, time, location, task, the cleaning method, the person responsible, and observations/comments. You can create tiles that will work as columns for each category.
- If you’re using a spreadsheet, create a new sheet and label the columns with the chosen categories and determine how often each of them has to be cleaned. If using a physical logbook, divide each page into columns or sections for the categories.
If you’re using the xTiles Cleaning Log Template, determine the frequency of your cleaning tasks. For instance, tasks like doing the dishes or sweeping the floor in the kitchen may be done daily to prevent a buildup of dirty plates by the end of the week. Conversely, tasks such as cleaning windows do not require daily or even weekly attention. Similarly, cleaning the chimney is rarely necessary more than once a year to prepare it for the upcoming heating period.
- If you’re creating a cleaning log for cooperative use or involving your family members, you can designate someone responsible for recording the cleaning activities.
The employees responsible for cleaning should fill in the log with the relevant information for each cleaning task performed, including the date, time, location, task details, cleaning method used, the person responsible, or any observations or comments.
You may print the filled-in template and leave it on a refrigerator’s door so everyone can put check marks whenever they finish their scope of work. A cleaning log for the whole family may be a great way to teach your children to keep a house tidy and clean at all times and that everyone who lives there is responsible for its condition.
- When the log is done, you need to review and monitor it regularly to ensure accuracy, completeness, and adherence to cleaning protocols. Also, if needed, you can add adjustments to make your log even more.
If your cleaning log is for corporate use, you may need to retain records for an appropriate duration based on your organization’s policies or any regulatory requirements. This allows for historical tracking, auditing, or reference purposes. Storing your logs in a digital format, instead of using paper logs, can be more effective, enabling seamless searching for specific data or dates.
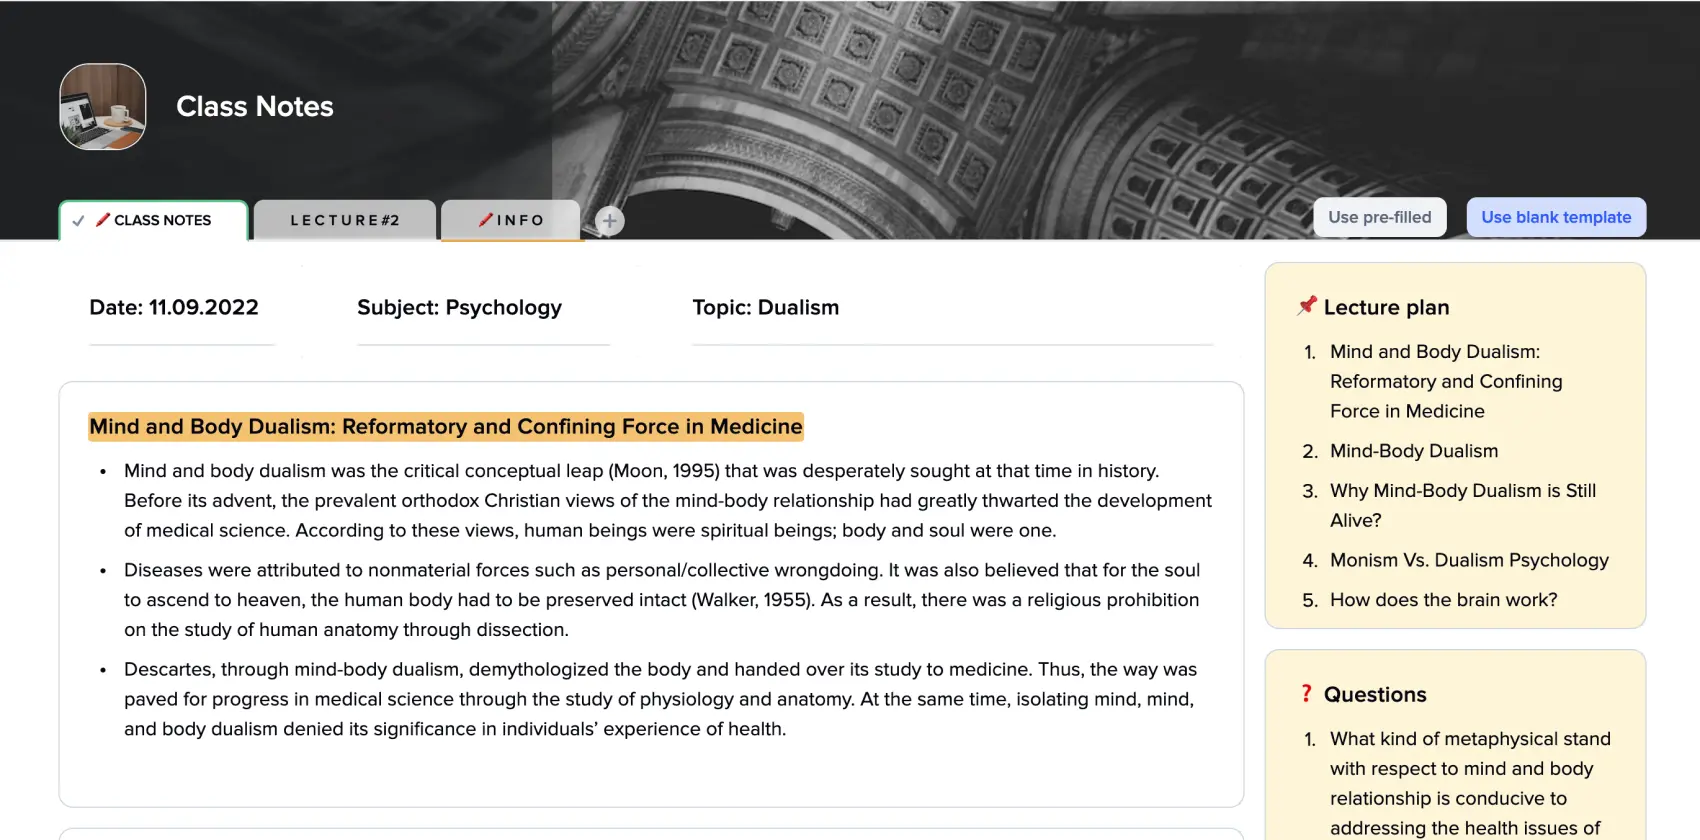
Class Notes
Character Profile
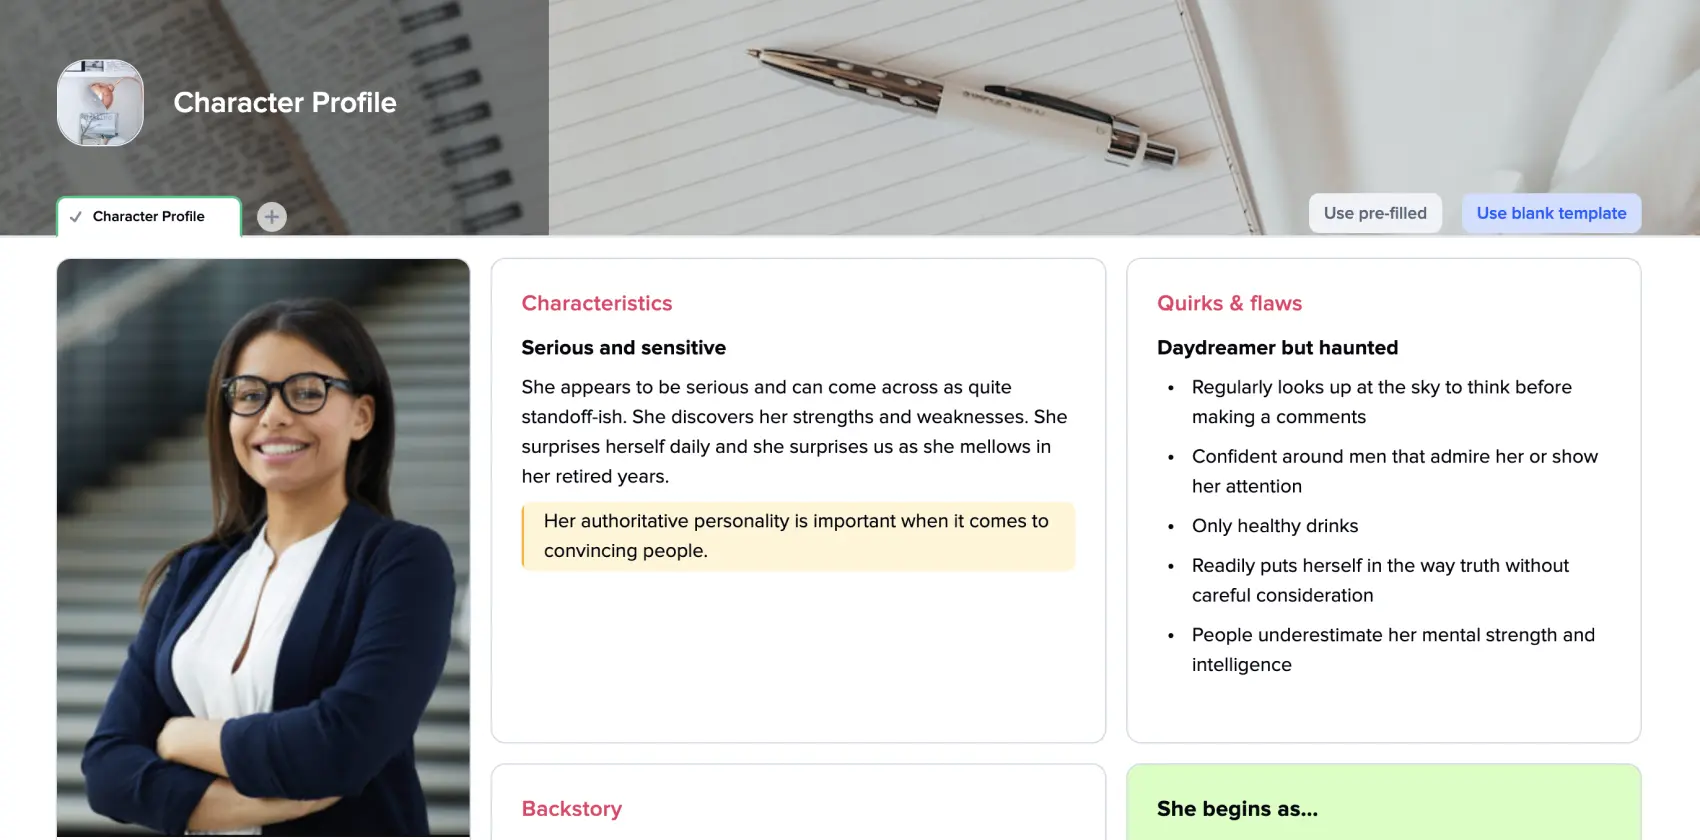
What is a character profile template
Аnd why do you need it to create a character that will be magnetic, realistic, and will raise readers’ interest without putting a tremendous effort into it? You may never have heard about these templates if you’re new to writing. However, even those who do it for a living sometimes might not know about them and the advantages they offer.
We all can agree that sometimes a realistic, well-developed character will be enough to win hearts and save the story. Sometimes they even outgrow the whole story and get their own lives in other people’s work. Creating a whole new person using just your imagination may be a tough and tricky process. Whether you want to make your readers exclaim “literally me” every time a character says something or make them feel hatred/affection/jealousy/pity (underline what you prefer), you will need a strict plan.
Thankfully, character profile templates are an easy way to have all the needed information at hand. They are basically a biography of your character, their social media profile (only you have full access) with their age, the most important information, cute (or not) background stories to give them more depth, their appearance, representing their relationships with others, and with everything you consider important for your story development and your character motivation revealing.
In this article, we’ll learn how to create a sharp character profile and present you with a character profile template you can use for any of your future and current projects.
Why are character profile templates important for a writer?
Have you ever met “flat” characters? They may be so boring that you can’t stand another sentence about them. Have you ever thought about what could change things and give them depth? What do all these poor characters lack? An interesting character that engages the audience in your writing is a collection of different features, ideas, thoughts, and details. If all of these combine successfully, you’ve succeeded. But how can one find suitable characteristics and mix them correctly? There’s no answer, only approaches you can try.
Generations and generations of authors did their best to give us a push and make the ideation process easier for us. We have many examples, other people’s experiences, and successes and failures to learn from. So, why not use others’ developments to reach your desired point faster? They had to use boards with cards, folders, lists, and bulky notebooks to have all the needed information about their characters in one place. Today, we can skip this time-consuming routine and go straight to the good part – creating.
A detailed character profile template is the first step to creating a character that will be “alive” and develop naturally throughout the story. Moreover, it’s the place you can return to anytime you have doubts about what your character would do or say under given circumstances.
When do I need a character profile template?
The person you know the best is you. And still, we keep forgetting facts about ourselves. How many times have others’ questions about you left you speechless? It is almost impossible to create a whole new person and keep their biography in mind without mixing things up. Whether you work on a fantasy, anime, or toyhouse character profile, a template will give you a better understanding of your character, so you will be able to better introduce them to the readers.
Definitely, it’s 99,9% that you won’t use all the stuff from your character profile (unless you work on a very detailed biography). Still, you need all this information to understand the person you’re writing about. What the reader gets is only the tip of the iceberg. However, what is underneath the water is the base you can’t neglect in an attempt to create a character that is likable and interesting.
There will be a point when you need to introduce your character to the public. That will be where you may use most of the information you put on the profile. However, you can’t use all of it in one place for the character’s and readers’ sake. When you have a profile, it will be easier to put these facts evenly through the text when you have a profile. You won’t overwhelm one chapter with all of them, leaving the rest with no character-revealing approaches.
Characters need to have their own voices and styles, so people can believe them, whether they are good boys or villains. What helps to reach that effect and make your character unforgettable? Tiny details. Their childhood memories, favorite songs, colors, a piece of clothes they wear all the time, etc. Pick something and put it into your character profile to find out how this detail works with other characteristics. Does it help to reveal the person or story? The detail may be there from the beginning and be a gun that will shoot at the end or emerge later just to represent your character changes.
When creating a character with many layers, you may need to conduct research and look for references. There are archetypes that work with appropriate kinds of stories. Define what is yours, and look through the popular culture to get what will be workable for your case. Check how they may behave and react. Such research also may be very helpful if you struggle with writer’s block.
So, as you can see, you may get a great deal of profit using a character profile template whenever you create something with characters in it. However, they are also good if you are stuck and can’t move any further in your story. Have you ever experienced the feeling that your story is leading you and then, all of a sudden, escapes, so now you’re the one who has to deal with everything? Character templates may help you gather all the facts you already know, reconsider them and your character motivations, take one more look at the current situation, and try to find the best solution.
How to use the xTiles character profile template to create an interesting and likable character?
Here, you can find a character profile template based on many researches and compilations. In an attempt to present you with something that will work, we checked dozens and dozens of them. So, let’s start creating your next character together. But first, here are a couple of suggestions about using the template.
- Put everything in. Now, when you’re at the beginning of creating your character, you can’t precisely know what will be helpful and what won’t. So, put everything that seems at least interesting or worth a second glance in your character profile. By working on it later and developing it, you will see what is worth using and what is unsuitable.
- If you use the xTiles character profile, it will be easy to rearrange everything later when you’re more aware of how your character should look. You can delete anything you want without any harm to the whole picture. And if you decide that your character doesn’t need something that you thought to be crucial earlier, just delete it. No crossings. The profile won’t be ruined as if you would use a paper notebook or a character profile template for Google Docs, where one accidental movement might spoil lining, tables, justifying, etc.
- Additionally, if you want to develop some aspect of your character better and think about it more carefully, you may go deeper and create a sub-document. You may dive into your characters, giving them everything they need to look real to a reader. Besides, your ideation process won’t be limited because you can freely add textual content, rich content, links, etc., to get a better understanding of the person you’re writing about, therefore, better represent them to others.
- Make a separate profile for every important character. If you want to be convincing, you need to pay attention to every character in your story. Even those who shortly emerge for a few pages must be interesting. Don’t deprive them of background stories, memories, and curious little details. Naturally, you don’t need to put as much effort into them as the main characters require, but their role is still hugely important for the picture in general. Think about them as supporting roles, and remember that those get Oscars and Golden Globes too.
Now, let’s switch to more specific suggestions and start outlining a character we want to get in the end.
- Decide on what character you will work on – protagonist (the main character in your story), antagonist (a character or group of characters that stand opposite your protagonist), anti-hero (may still be your central character but without traditional heroic attributes), foil (a character who will make your main hero features more noticeable), or confidante (a character what will know your main hero the best).
Before you decide on this one, please remember that every story is unique, and there are no rules that can force you to create characters of the needed types only so that the story will work. Whether it works or not depends on many factors and their combinations. So, be inventive. Let your imagination free and enjoy.
- Now, we need to get the main information about your character – name, age, place of birth, current place of residence, nationality, marital status, education, etc. These formal details are needed to put your character in a frame where they will develop further and, maybe, go beyond it during the process or as a catharsis in the end.
Guides on character profile creation often claim this part is the easiest one. Well, it may be if you already have some ideas about your character profile. However, they are starting points, so please don’t neglect them. The person’s nationality, education, or social status are often catalysts for a story’s development, so they should be polished and well-thought-out.
- The next step is to imagine how your characters look. Their height, eyes color, hair color, etc. You may find someone whose physical appearance matches your character on the internet and put their photo in the profile. It may be a celebrity or a person you know.
What is important about this step, you need to think about whether your character will have distinguishing marks or not. Do you want them to have scars or tattoos, for example? Will it help to represent them better and show their individuality? Do they wear a certain piece of clothing or accessories constantly? All these small details make a character alive.
- Now, let’s decide on your character’s main characteristics. Are they soft, scared, brave, ignorant, funny, self-destructive, boring, tired, depressed, curious….? You may try to combine a couple of characteristics if you want to create a complicated multi-layer character. Don’t be scared to blend those that don’t combine at first glance. For example, it may seem that a person can’t be funny and depressed at the same time, but it may be their inner struggle.
- It’s time to come up with the character’s backstory and biography before the story begins or they emerge in it. Did they love their parents? How did their school years pass? What music did they like when they were younger? Remember to use your imagination and use little accents every now and then to make the character seem real.
- What can make a fictional character seem even more real? Think about their quirks and flaws. What do they like or dislike doing? What can’t they stop doing? Maybe there is something strange about the character’s behavior that even you can’t understand fully. All details are important.
- Finally, outline who your character is in the beginning and whom you would like them to see at the end of the story. Everything in the middle will be the work to do, but at least you will see where to move. However, remember that everything may change. You don’t have to stick to your initial idea if you see that your character moves in other directions.
- And one last time, we would like to remember that let no rules or conventional ideas limit your imagination. Create freely using the xTiles character template!
Campaign Brief
Campaign brief template
Marketing plays a vital role in communicating a business’s offerings to consumers. It has numerous tools and approaches to help businesses reach their goals, and new ones are being invented constantly. One of them is a campaign brief that helps companies to establish a connection with their target audience.
By crafting a campaign brief, companies ensure that their communication and advertising materials effectively resonate with potential customers. As a rule, it provides detailed information about a specific campaign’s goals, target audience, messaging, creative concepts, media channels, budget, timeline, and other tactical elements.
Having a clear understanding of what a campaign briefing entails and what elements to include is key to delivering a compelling marketing campaign. A campaign brief template is a shortcut with a guarantee that no point will be missed among the unstoppable stream of information.
In this article, we will explore the concept of a campaign briefing, highlight essential components to include, and provide guidance on writing one effectively using the xTiles Campaign Brief Template. We also offer you a campaign brief example to show you what you can get using the template.
What is a campaign brief?
A campaign brief serves as a foundational document that establishes your marketing campaign’s fundamental guidelines and objectives. Whether your company uses email marketing, telemarketing, or advertisements, the campaign brief outlines what you aim to achieve through these efforts.
The document’s significance extends beyond in-house campaigns, as it plays a crucial role when collaborating with agencies or other third parties. By clearly communicating your objectives, a campaign brief empowers companies to align their expectations and ensure everyone involved understands the desired outcomes.
This comprehensive document covers various aspects of the campaign, including identifying the target audience, specifying the desired audience actions, and determining the project budget. By addressing these key elements, the campaign brief ensures that all contributors involved have a shared understanding of its purpose and can collectively work towards achieving the defined goals.
Why do companies need campaign briefs?
Crafting an effective campaign brief is crucial for establishing the purpose and scope of any marketing campaign in accordance with the available resources and capacities of the company and/or team. These briefs serve several important functions, including:
1. Providing key product information
Campaign briefings communicate essential product information to creative teams, enabling them to gain a better understanding of company expectations. This information empowers the creative team to develop relevant and impactful marketing materials that will be in alignment with the initial idea.
2. Setting clear campaign goals
The opportunity to clearly explain works in both directions. By outlining campaign objectives and desired outcomes, briefings help companies set clear goals. This clarity ensures that everyone involved in the campaign understands the intended direction and can work towards achieving the defined objectives.
3. Aligning with a brand image
Campaign briefings ensure the planned campaigns align with the established brand image and messaging. This alignment helps maintain brand consistency throughout the whole campaign/project and reinforces the desired brand perception among the target audience.
4. Decreasing approval time
With a comprehensive briefing, the decision-making and approval processes become more efficient. Stakeholders can review the campaign details, provide feedback, and make informed decisions more swiftly, reducing project approval time.
5. Establishing evaluation measures
Effective campaign briefings include measures to evaluate the success of the campaign. That allows companies to track key performance indicators, monitor the campaign’s impact, and make data-driven adjustments to optimize results.
6. Creating a streamlined overview
Campaign briefings provide a concise and organized overview of the intended campaign. That allows stakeholders to grasp the campaign’s strategy, target audience, messaging, channels, and budget at a glance, facilitating effective communication and coordination among teams.
What aspects to consider when crafting a campaign brief when you’re a client?
An effective campaign brief encompasses key elements that provide a clear outline of a marketing campaign. As with any other concise document, a campaign brief needs thorough consideration. Otherwise, its content might not be fully representative.
Here are the essential components to discuss before you start crafting the document:
1. Target audience
Clearly define the intended audience, providing detailed information to help the creative team understand who they’re targeting. Be very specific because usually, when trying to cover as many different groups of people as possible, companies actually cover no audience as no one understands what the product is for.
2. Product information
Highlight key aspects and unique selling points of the product or service being promoted. Let the creative team knows what you want to emphasize about your product and devote all their attention and creativity to these points.
3. Commercial context
Provide relevant market context, including competitor analysis and market trends, to help shape the campaign strategy. Name your main competitors and what you particularly like about their products or services and how they advertise them. That information may help a creative team to find the needed direction for work.
4. Proposed budget
Specify the budgetary constraints to guide creative teams in developing ideas within the financial resources. Even though this part is probably the most boring for creative teams, it is highly important to let them know their budgetary frames.
5. Company and brand guidelines
Share information about the company’s brand tone, image, and existing guidelines to ensure campaign consistency. The more information you can provide about all the previous projects, campaigns, and decisions, the better. Great ideas rarely emerge out of nowhere.
6. Preferred channels
Communicate any preferred marketing channels or platforms that should be considered for the campaign. You may like some platforms and dislike others. You may have previous unpleasant experiences with some platforms. Let the creative team knows that to craft the best campaign for your product or service.
7. Analysis of previous campaigns
Provide insights into the performance of previous campaigns to help identify effective marketing methods. Previous mistakes or successes are always great ways to learn and build new strategies.
8. Desired audience outcome or action
Clearly state the desired action or outcome expected from the target audience and define metrics for measuring campaign success. If a creative team knows what you expect, it will be easier for them to create a specific strategy that will convince people to do what you exactly want them to.
9. Mandatory elements
Identify any essential product details or key messages that must be included in the campaign. They will be organically built within the campaign, or the campaign will be built around them.
10. Campaign duration
Outline the campaign’s start and end dates, along with any project deadlines or milestones.
Campaign brief templates
When writing a clear and engaging overview of your ideas, using a marketing campaign brief template can greatly simplify the process.
By selecting the appropriate creative brief template that aligns with your marketing program or campaign, you can easily structure your ideas and ensure all relevant information is captured effectively. Besides that, using campaign brief templates offers several benefits for marketers and businesses.
1. Consistency
Templates provide a standardized structure for campaign briefs, ensuring consistency across different projects. This consistency helps maintain brand identity, messaging, and overall marketing strategy.
2. Time-saving
Templates save time by providing pre-designed sections and prompts, allowing marketers to focus on filling in the specific details relevant to their campaign.
3. Comprehensive coverage
Templates often include key elements and sections that need to be addressed in a campaign brief, ensuring that critical information is not overlooked.
4. Improved organization
By providing designated sections and fields for different aspects of the brief, templates help marketers structure their thoughts and information in a clear and organized manner.
5. Collaboration and communication
With a standardized format, it becomes easier to share and discuss the campaign brief across teams, agencies, or clients, fostering better communication and understanding.
6. Efficiency and productivity
By streamlining the briefing process and providing a framework to follow, templates help improve overall efficiency and productivity. Marketers can focus on filling in the specific campaign details rather than spending excessive time on formatting or structuring the brief.
7. Adaptability
Templates can be customized and adapted to suit different types of campaigns or marketing initiatives. They can be modified based on the specific requirements, goals, and channels relevant to each campaign, ensuring flexibility in their usage.
How to write an effective marketing campaign brief using the xTiles Campaign Brief Template?
Writing an effective marketing campaign brief involves carefully planning and considering key elements. Here’s a quick step-by-step guide on how to write an effective marketing campaign brief using the xTiles template.
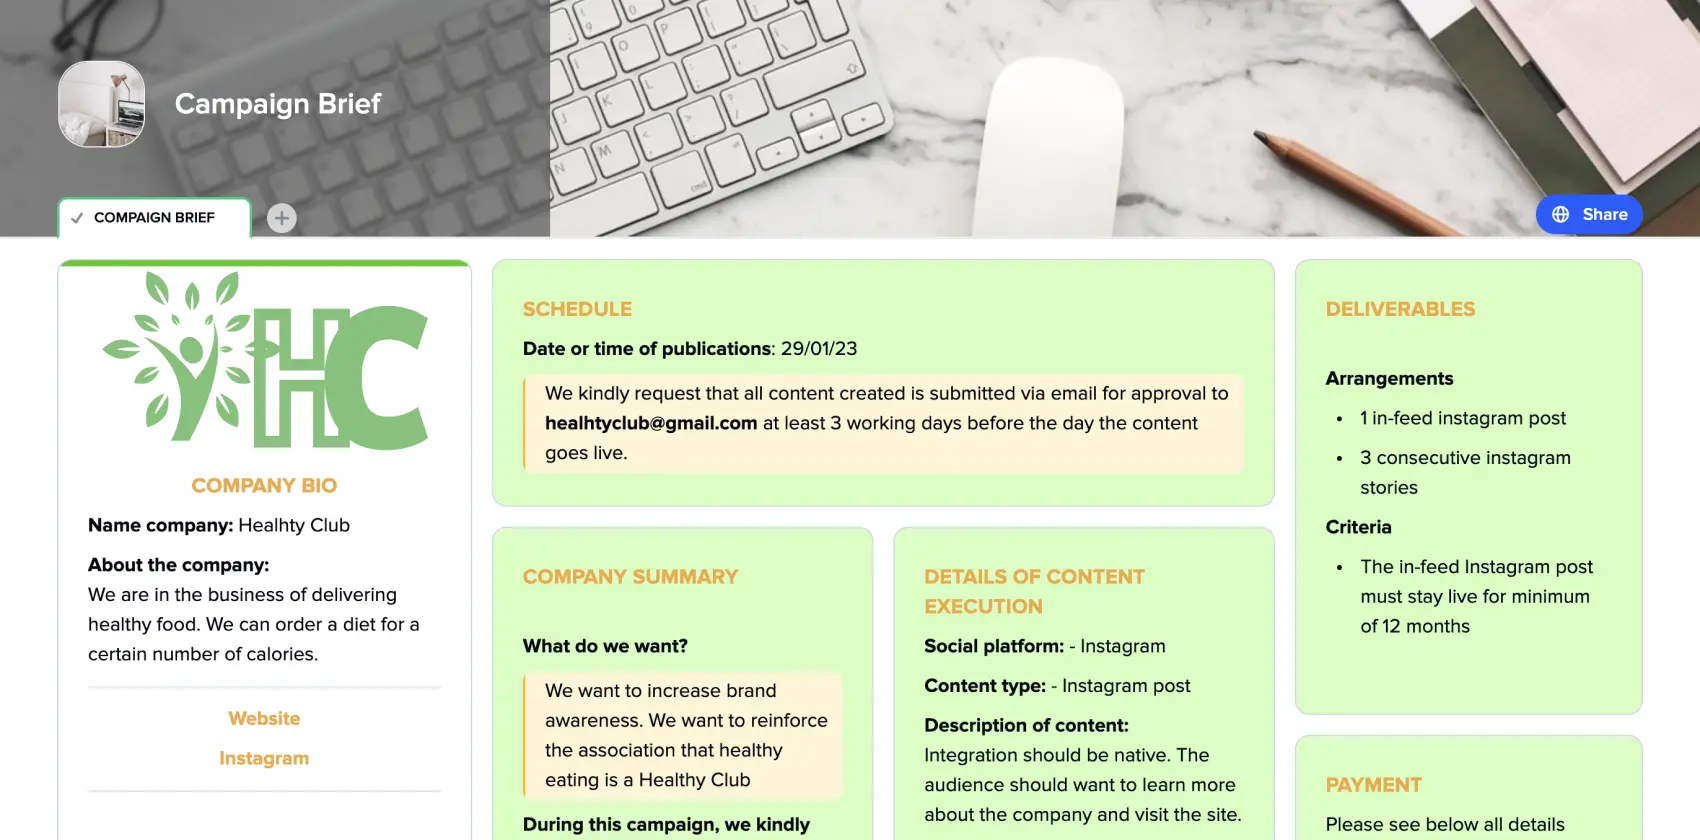
1. Tell a bit about the company
Provide a short bio of your company, its values, history, important moments, key aspects, etc. Also, you add all the relevant links to social media and a website if there are some. Explain who is your target audience.
You can add some pictures or photos to describe your company/product/service visually.
2. Establish schedule
Define the campaign timeline, including important milestones and deadlines, to ensure smooth execution. Tell how often you want to see new content, when you want to get the finished campaign plan, etc.
3. Provide a company summary
Use this section to summarize what you want to see during the campaign and what you prefer to avoid. That information will help a creative team to provide results in alignment with your expectations.
4. Provide details of content execution
Consider digital platforms, social media, email marketing, traditional media, or a combination of channels. Align the channel selection with the campaign objectives and target audience preferences.
Tell what kind of content you need, for what you need it, and how often you need it. Include all the important details, such as the hashtags you want to be used, specific keywords, calls to action, etc.
Outline the desired look and feel, brand guidelines, tone of voice, and any specific visual elements to be incorporated.
5. Provide deliverables
Outline what you expect from the campaign. You may determine the metrics that will be used to evaluate the success of the campaign.
6. Plan your budget
Establish the budget available for the campaign and allocate resources accordingly.
7. Share the content you want to see or references
You may provide a creative team with photos of your business or product you want to see published during the campaign. Or, if you have no visual content, you may provide references so that the created content will meet your expectations.