Intro to Task Block
-
Define and assign tasks to specific team members with clear separation of responsibilities.
-
Store tasks alongside relevant notes and media within any page or workbook.
-
Track all tasks in the Task Panel and Calendar for seamless navigation.
-
Ensure automatic updates—any changes made in one place are instantly reflected across all views and devices.
-
Go beyond standard lists by setting due dates, assigning tasks, and adding reminders or recurrence options.
Ways to Create Tasks in xTiles
- Selecting task template while creating a tile.
- Using “+” or “/” commands in filled tiles.
- Converting existing text blocks to tasks through the block menu.
- Converting checkboxes to tasks via hover calendar icon.
- Using a shortcut ()+Enter.
Where Can You Create Your Tasks
- Creative Pages: Tasks can be initiated directly within tiles on your creative pages.
- Collections: Tasks can be added to cards within your collection.
- Task Collection: A dedicated Task Collection provides a centralized location for all your tasks.
- Calendar: Tasks can be created and viewed within your personal Calendar.
- Task Panel: The Task Panel serves as a sidebar for managing and viewing all tasks.
- My Planner: The “My Planner” widget tile consolidates tasks from across your xTiles workspace, offering an overview of your workload.
How to Schedule Tasks
- From the Calendar Icon: Hover over the task block and click the calendar icon on the right to select a date.
- From the Block Menu: Open the block menu on the left side (six-dot), click the calendar icon, and then choose a date.
- From the Expand Mode: Create the task and open it as a note with the expand feature. In the “Due date” line, select the required date.
- From the Task Collection (Table View): In the Task Collection, switch to table view and directly edit the “Due Date” column.
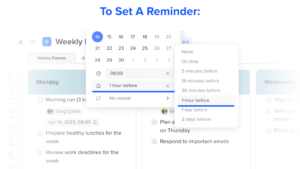
How to Set Reminders or Recurrences for Task
- Click the calendar icon or click the due date field in expand mode.
- Click “Add a reminder” at the bottom of the menu that appears.
- Choose the desired reminder time from the dropdown.
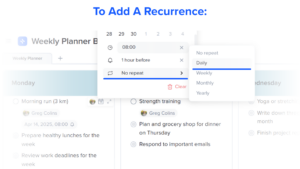
- Click the calendar icon or click the due date field in expand mode.
- Then, click the tab “No repeat” at the very bottom of the window.
- Select from options like “Daily,” “Weekly,” “Monthly,” or “Yearly” to set your task to repeat automatically.
How to Assign Tasks
Let your teammates know what they should complete by assigning tasks for them. For example, you can assign tasks this way:
- Hover over the task block and click the assign icon that appears.
- Choose a team member you want to assign a task to.
- Misclick the window to save the changes.
About other collaborative solutions, you can learn from our in-depth guide ➡️ How to collaborate: Tasks
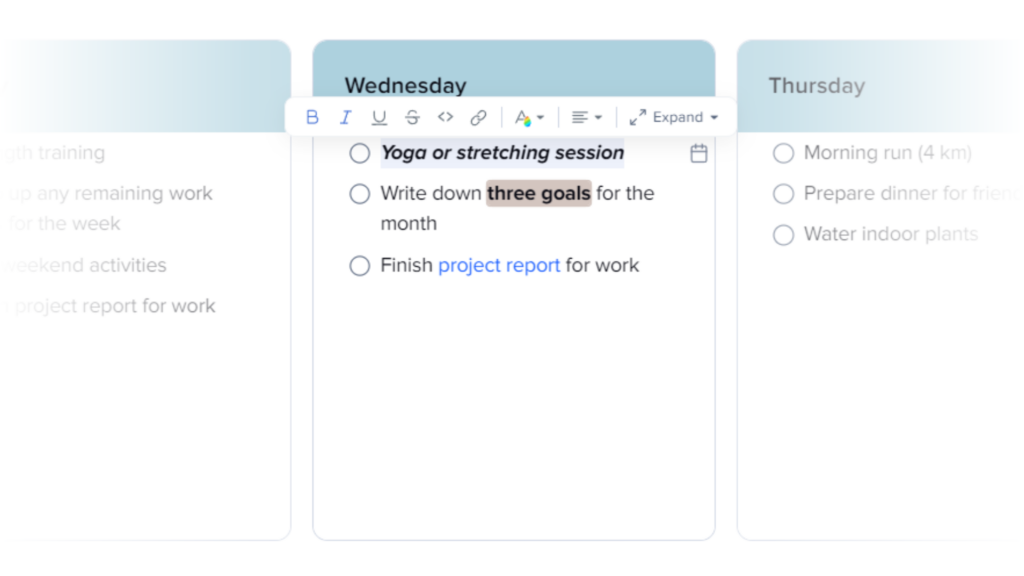
Task Block Formatting
You can also adjust your tasks by highlighting the line and choosing the desired feature from the formatting panel. Select from:
- bold text
- italic text
- underlined text
strike text- add a
code - paste a link
- set a font color or highlight
Additionally, choose the alignment or expand your task to note to add additional details.
Notifications
Keep every project moving forward smoothly by staying updated with your to-dos thanks to the xTiles notifications. When someone assigns a task for you, you’ll receive a notification immediately to get things done as soon as possible. Once you’ve marked a task as completed, the person who created it will receive a notification. This feature works in two ways, so you can effectively manage your tasks and enhance your productivity within xTiles.
🚨 Note: Keep in mind that you can only assign a task to someone with editing rights or the owner of the document
Other Ways to Interact with Your Tasks
Beyond simply marking tasks as complete, xTiles offers several ways to engage with your to-dos. You can foster collaboration and provide context by leaving comments directly on tasks, allowing for detailed discussions and clarifications. Additionally, express your reactions and acknowledge task updates quickly by using emojis, adding a layer of visual communication and engagement.
Join our community and stay tuned for product updates
Learn more about our plans and available features, visit the pricing page and choose the best option that fits your workflow.
Stay updated on xTiles product updates with the changelog.
Join the xTiles community on Slack and Discord instead visit the Youtube channel and xTiles blog, and follow us on social media to stay informed about the latest news, updates, and great content!

